How To Install CCleaner On Windows 10

How To Install CCleaner On Windows 10


Introduction

Hey I'm Vikash and you are reading Tashinva Post So today over the topic is what is CCleaner, Where it's use and How to We use it. and How To Install CCleaner On Windows 10

You can follow me on Instagram https://www.instagram.com/vk_singh_104/

When you run CCleaner it's collect usefulness data temp files recent files and more browser data we can't use it again So it's Collect all data and detect this with your permission and make your Computer faster and more options are available in paid versions


What Is Ccleaner

CCleaner is a Storage Cleaner Software for Windows. It's available for Windows 32-bit and 64-bits,  Mac, Android it's written in the C++ Programing language. Free and paid both of versions are available for Windows. it's available for All Windows 7, 8.1, and 10.

CCleaner, developed by Piriform, is a utility used to clean potentially unwanted files and invalid Windows Registry entries from a computer. It is one of the longest-established system cleaners, first launched in 2004. It was originally developed for Microsoft Windows only, but in 2012, a macOS version was released.


How CCleaner Work and His feature

When you run CCleaner it's collect usefulness data temp files recent files and more browser data we can't use it again So it's Collect all data and detect this with your permission and make your Computer faster and more options are available in paid versions


Faster Computer

If your computer running slow? As it gets older it collects unused files and settings which take up hard drive space making it slower and slower. CCleaner cleans up these files and makes it faster instantly.

Safer Browsing

Advertisers and websites track your behavior online with cookies that stay on your computer. CCleaner erases your browser search history and cookies so any internet browsing you do stays confidential and your identity remains anonymous.

Fewer Errors & Crashes

Over time your registry can become cluttered with errors and broken settings which lead to crashes. CCleaner’s patented registry cleaner clears out this clutter to make your PC more stable.

Quicker Startup

Many programs run silently in the background when you start up your computer. CCleaner helps you get to work or play faster by letting you disable unneeded programs.

How To Install CCleaner On Windows 10


Now I show you How To Install CCleaner On Windows 10 with images and Step by Step So Let's Go

1. Download CCleaner

First, you need to download CCleaner Software from his official website https://www.ccleaner.com/ccleaner/download CCleaner Software Size is 22 MB on May 2020. If you Don't use it on a high level you recommend download free version and first Use free version and try it.

2. Install CCleaner On Windows 10

Before Start Installation you need to Turn off You Internet data (Wi-Fi) because if your internet connect to your PC CCleaner install author Software without your permission so

2.1 Right Click on CCleaner.exe (Downloaded file) file and start it Run as administer.


2.2 Click On Install


2.3 Wait same time for installation


2.4 Click on run ccleaner


3. Clean Your Computer by CCleaner

Open CCleaner and open Custom Clean and click on analyze. CCleaner Start analyzing so wait same time for complete full analyzing.


After Complete analyzing process click on cleaner


OK we are successfully install and clean our computer by CCleaner with free version.

Short Steps to Install CCleaner on Window 10

  1. Download CCleaner exe file from ccleaner.com
  2. After Download CCleaner exe file Turn off Data (Disconnect Wi-Fi)
  3. Run CCleaner exe file 
  4. Click on Install
  5. Wait For Installation
  6. After Complete Installation Run CCleaner
  7. Go to CCleaner<Custom Clean click on analyze
  8. After Complete analyzing process click on Run Clearner
Thank You Friends If your Windows are slow you may be like these
5 Way to Speed up you Window PC
Speed up your Window by CCleaner

Again Thank You So Much 😜😝😃
You can follow me on Instagram https://www.instagram.com/vk_singh_104/

How To Change Kali Linux to Windows 10 (2020)

How To Change Kali Linux to Windows 10 (2020)

Kali Linux is a Unix based Operating System. In the last Year, 2019.4 update is realized. In this update The Kali Linux all changed new look new Desktop New Icons and Everything is new in this update it increases Kali Linux Speed and Looks.

For Giving a new look to Kali Linux it's has a new Windows 10 theme the Kali Undercover Mode as default by Unix Team in this we are changing Kali Linux Looks like Windows 10 Without Any Problem I Liked this Feature

How To Change Kali Linux to Windows 10 (2020)

So we have Two methods for Change Kali Linux to Windows 10. First by Kali Undercover Mode as a tool by press Window Key and Type Kali Undercover Mode and hit Enter. Second is by Command Open Kali Linux Terminal and type kali-undercover and hit Enter. So This two way we have for Change Kali Linux to Windows 10 Now I Show you Both of method with Images How To Change Kali Linux to Windows 10 (2020)

Change Kali Linux to Windows 10 (By Command)

Short Steps for Kali Linux to Windows 10
  1. Open your Kali Linux terminal
  2. Type kali-undercover 
  3. Hit Enter
  4. The Kali Linux Changed
1. Open Your Terminal and Type: "kali-undercover" hit Enter

2. it's changed

3. Return to Kali Linux open terminal and type: "kali-undercover" and hit Enter

Change Kali Linux to Windows 10 (By Undercover Tool)

  1. Press Windows key 
  2. Type: undercover
  3. Open First tool
  4. Tool Full name is Kali Undercover Mode
  5. Search Kali Undercover Mode and open it for go back to Kali Linux

Change Kali Linux to Windows 10 By Undercover Tool With Images

1. Press Win key and Search Kali Undercover Mode and open the first Result


2. Return to Kali Linux again search and Click on Kali Undercover Mode again change

Thank you for read if you have any problem watch this YouTube Video for better understand and best Experience Again Thank You

HOW TO ENABLE DARK MODE IN WINDOWS 10

HOW TO ENABLE DARK MODE IN WINDOWS 10


Hello, Friends, I'm Vikash. Today we are Learn About HOW TO ENABLE DARK MODE IN WINDOWS 10.

In Window 10 New Update we get a new feature the "Dark Mode" and lite mode the lite mode is already enabled by Mircosoft but we need to enable "Dark Mode" from our side.


So Let's Start I'm Show your all Step by Step with Images so Don't Skip Anything.

HOW TO ENABLE DARK MODE IN WINDOWS 10


1. Open Your Windows 10 Setting

2. Open Personalization in Windows Setting

3. Open Color Section in Window Setting

4. Chose Dark Mode

5. Change Color rad (Better Experience)

6. Set Black Background Image In HD (Better Experience)

HOW TO ENABLE DARK MODE IN WINDOWS 10 WITH IMAGES

1. Open Your Windows 10 Personalization Setting

Windows 10 Personalization Setting

2. Open Color Section in Window Setting

Open Color Section in Window Setting


3. Chose Dark Mode in Windows 10 Setting

Chose Dark Mode in Windows 10 Setting


4. Change Color rad (Better Experience)

Change Color


5. Set Black Background Image In HD (Better Experience)

Set Black Background Image In HD (Better Experience)


Now Your Windows 10 Setting in Dark Mode.

Windows 10 Setting in Dark Mode.


Windows 10 Desktop in Dark mode. Why I tell you Do it and try it's free and enjoy it because you pay money for it. Thank you So much for reading at last If you want to read more visit Microsoft and Windows 10 Offical Website if you have any problem and Suggestions for me Please Comment Again.


ThankYouSoMuch

HOW TO INSTALL VIRTUALBOX IN WINDOWS 10

HOW TO INSTALL VIRTUALBOX IN WINDOWS 10


I show you How to install Virtualbox in Windows 10. How to install kali Linux in VirtualBox Windows 10. How to install windows 10 using VirtualBox. How to install ubuntu on VirtualBox in Windows 10. How to install ubuntu in windows 10 using VirtualBox. How to install Virtualbox on windows 10 64 bit. Install Linux on Windows 10 Virtualbox

WHAT IS VIRTUALBOX

Oracle VM VirtualBox is a free and open-source hosted hypervisor for x86 virtualization, developed by Oracle Corporation. Created by Innotek, it was acquired by Sun Microsystems in 2008, which was in turn acquired by Oracle in 2010. VirtualBox may be installed on Windows, macOS, Linux, Solaris, and OpenSolaris. Read More
HOW TO INSTALL VIRTUALBOOX IN WINDOWS 10

1. Download VirtualBox from https://www.virtualbox.org/
First Download VirtualBox From Google

2. Open VirtualBox Downloaded file by Dual Click for Install VirtualBox
Open VirtualBox Downloaded file by Dual Click for Install virtualbox

3. Click on NEXT
Click On Next for Install VirualBox

4. First  not important Simply Click on next
Select Location for Install VirtualBox and Simply Click on next

5. Select All Options and Click on NEXT
Select All Options it's better for Install VirtualBox

6. Click on NEXT
Click on Yes for install VirtualBox in windows

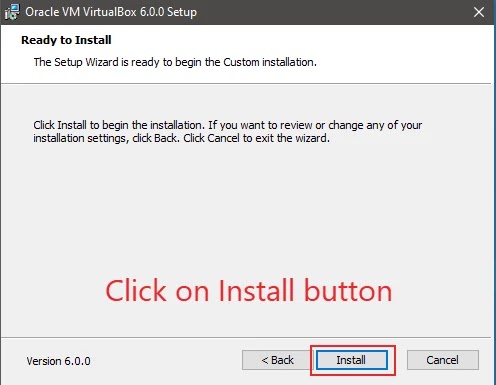
7. Now Click On Install
Click on Install for Start VirtualBox installation

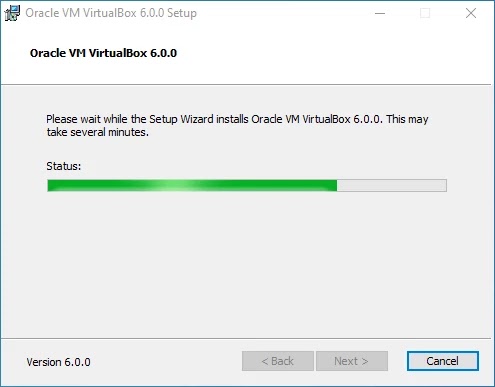
8. Wait Same time for VirtualBox installation
Wait Same time for Complete VirtualBox Installation

9. The Installation Start Wait Same time for Complete VirtualBox Installation
VirtualBox Installation started

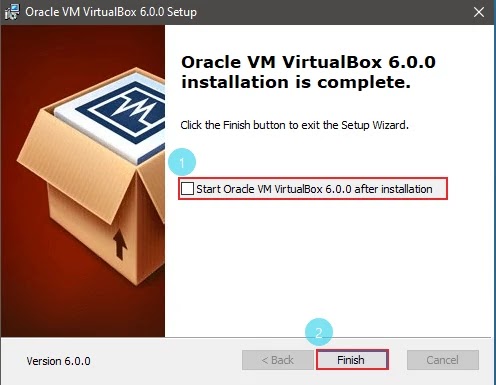
10. Click on Finish After complete the process of VirtualBox Installation
The VirtualBox Installation completed so click on finish

11. Shortcut ICon Automatic Create on Desktop
Open VirtualBox by Dual Click

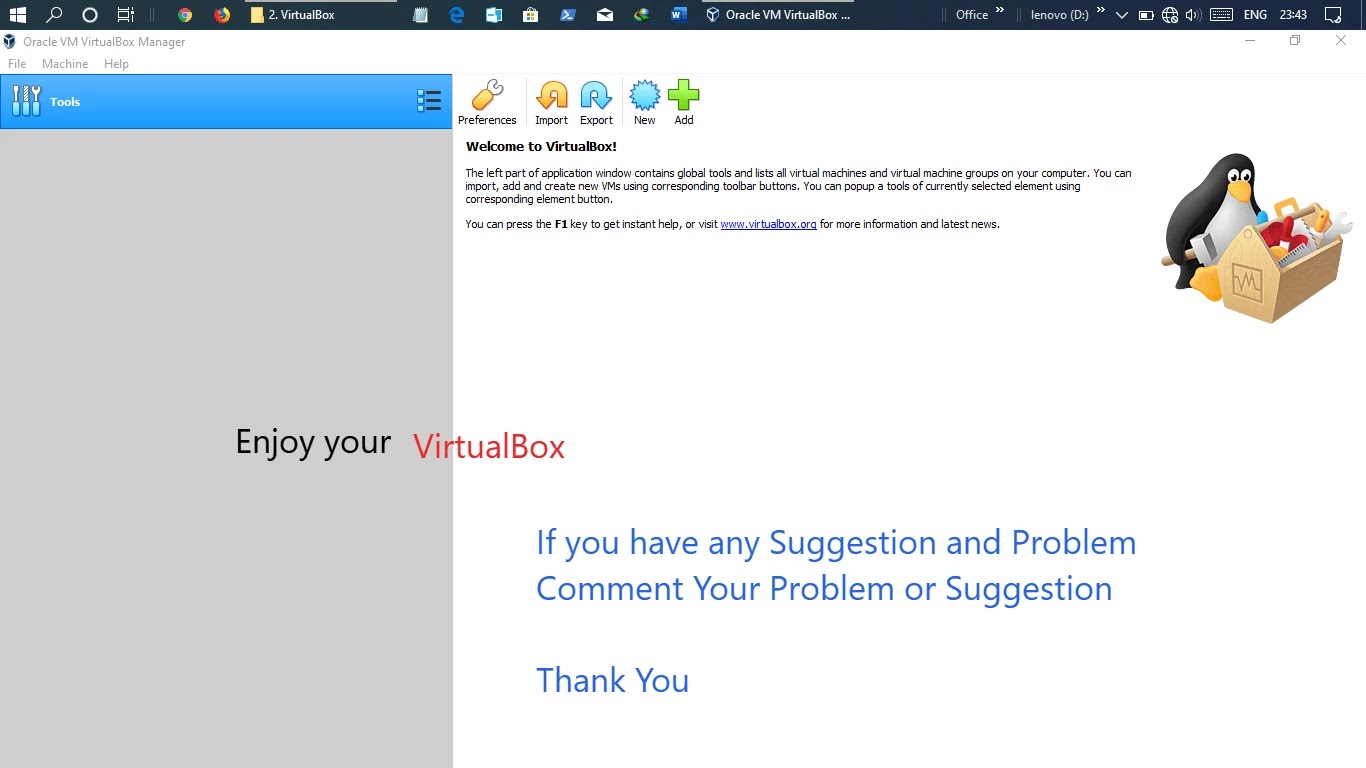
12. Open Virtualbox by Dual Click on Desktop Shortcut Icon
VirtualBox Installation completed and it looks like it


Thank You If you get any problem and issue Please Comment

How to Install VLC Media Player in Windows 10

How to Install VLC Media Player in Windows

[full_width]

VLC is a media player we play videos, movies, Song on VLC it's very popular and best media player for every Operating System (Mac, Windows, and Linux) VLC available for them.

So Day I will show you how to download and install VLC on Windows 10. If you have author Operating System just like Windows 7, 8.1 10 the Same method apply for every Operating System So Let's go Follow my Step
How to Install VLC Media Player in Windows 10

1. Download VLC Media Player www.videolan.org
How to Install VLC Media Player in Windows 10

2. Right, Click On Downloaded exe. and Run as administrator
Right, Click On Downloaded exe. and Run as administrator

3. Select your Language

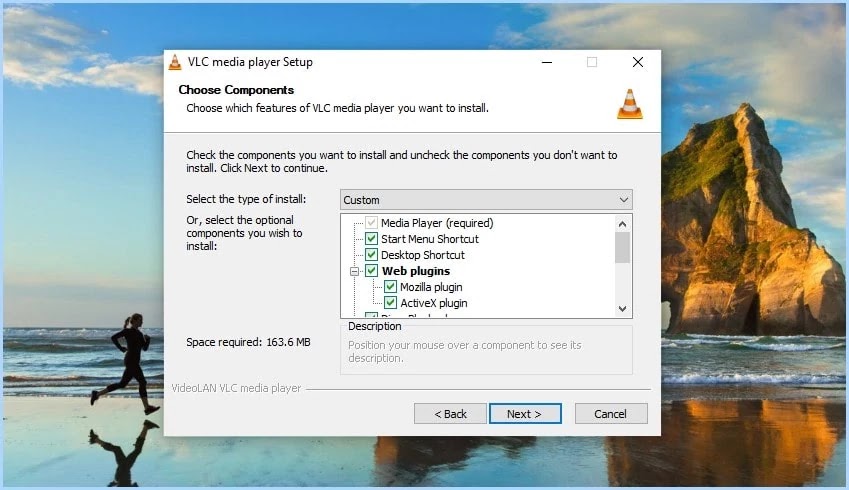
4. Click on Next

5.  Click on NEXT

6.  No Change Simply Click on NEXT

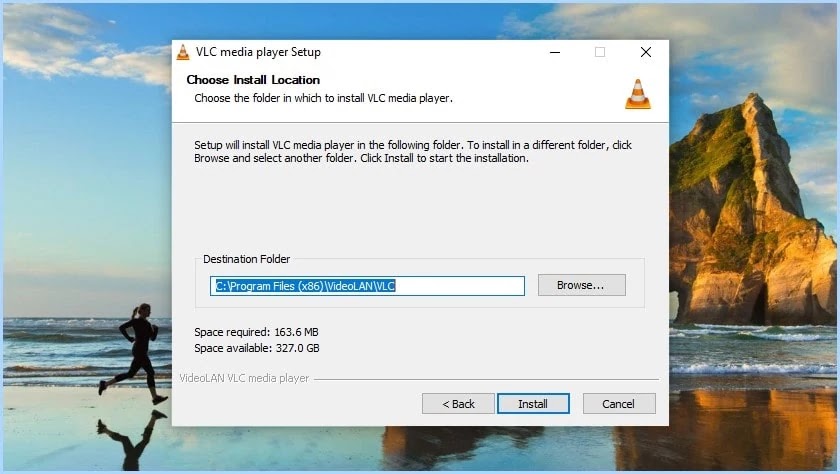
7. Select Location you installation (No Change) click on Next

8. The Process starts to Install VLC Media Player

9. Click On Finish

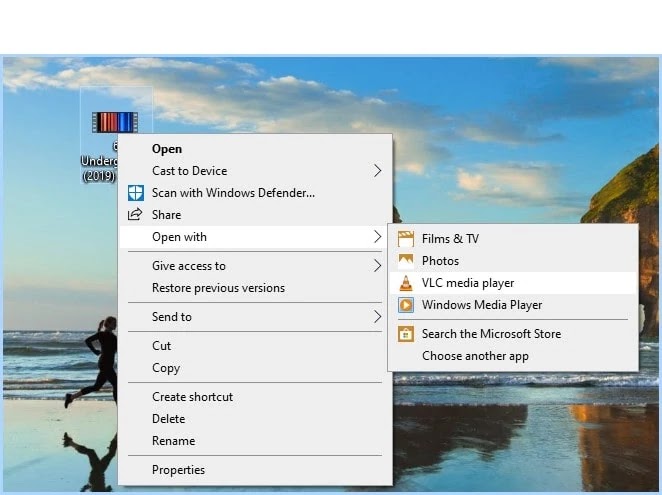
10. Right Click on Video and open with VLC Media Player


How to Check Processor in PC

How to Check Processor in PC


Many times we don't know Which processor use in my pc it's very essay to chack processor in pc if you have windows any window just like 10, 8.1, 7 this method works on all windows

I Know three method for Check Processor in PC First methods are very essay second ok-ok but the third method are in deep
How to Check Processor in PC

Mathos One for Check Processor in PC


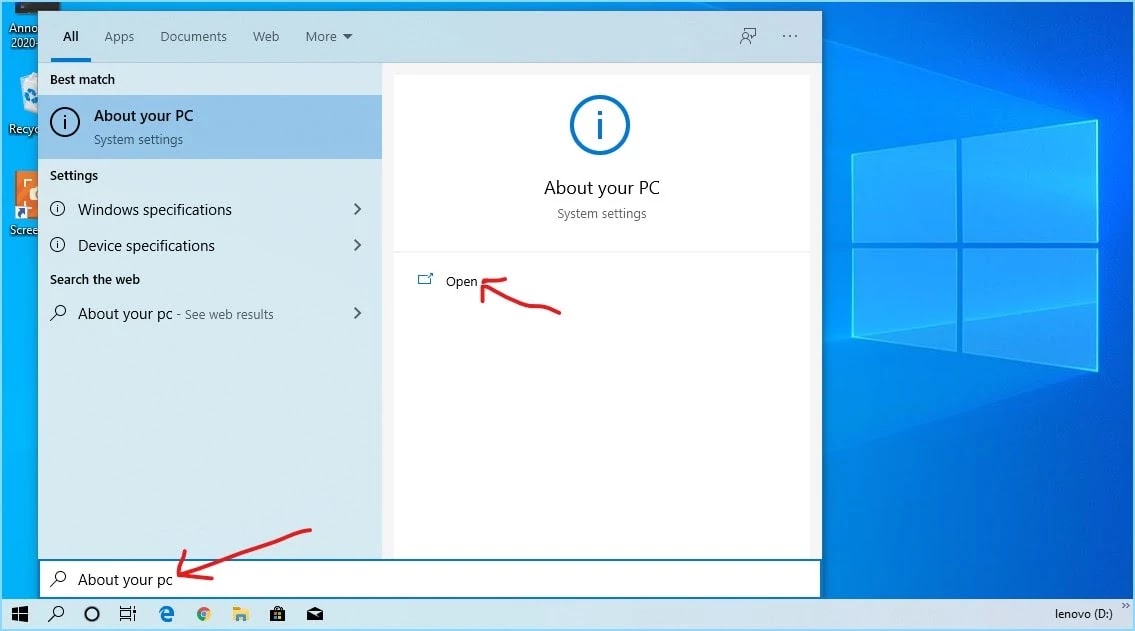
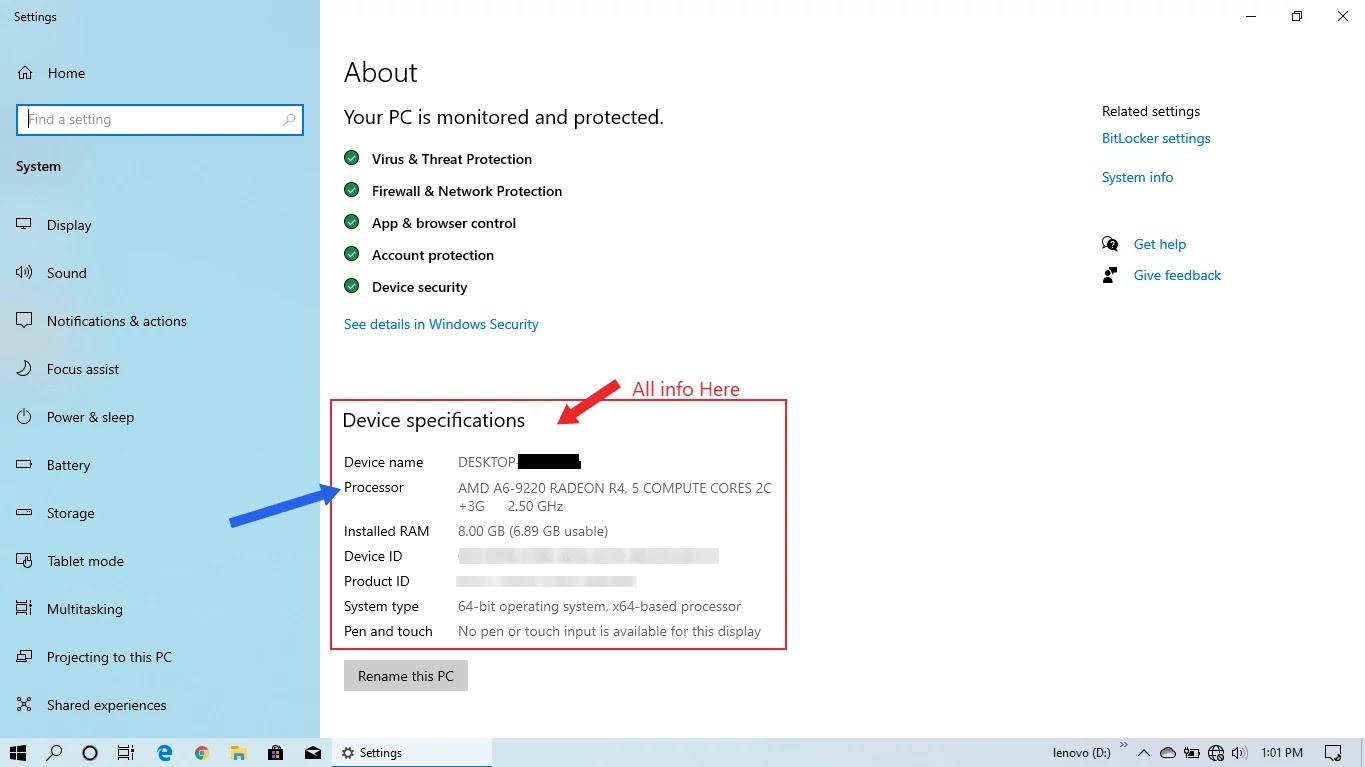
1. Press "Win key + S" and search "About You PC" and Open

Press "Win key + S" and search "About You PC" and Open

2. Now Check Processor in PC


Mathos Second for Check Processor in PC


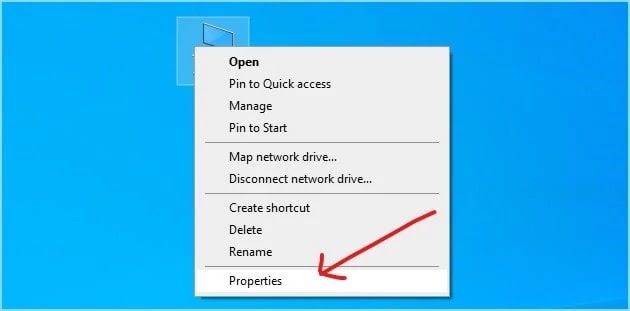
1. Right Click on This PC and open Properties
Right Click on This PC and open Properties

2. Chack you PC Processor

Method Three for Check Processor in PC

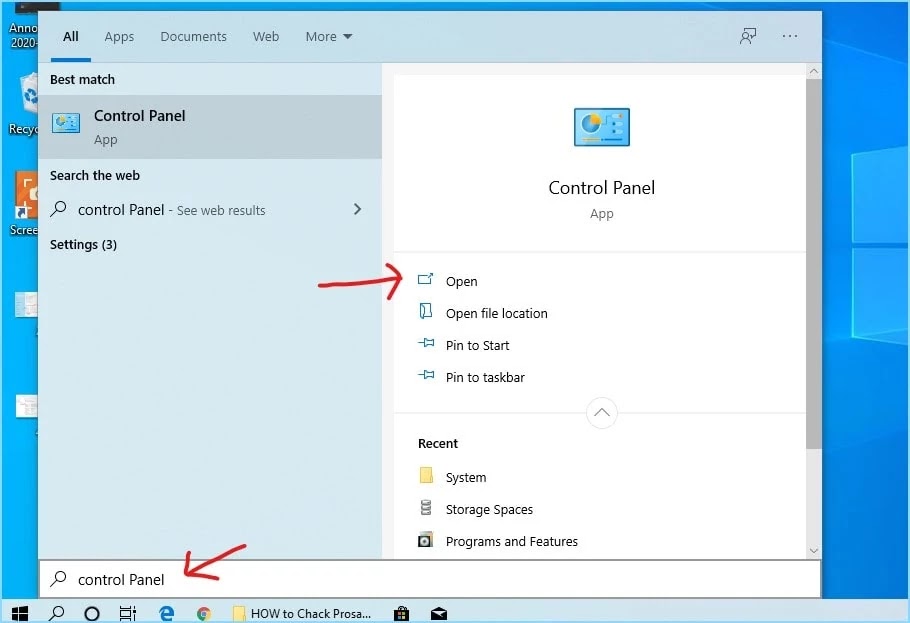
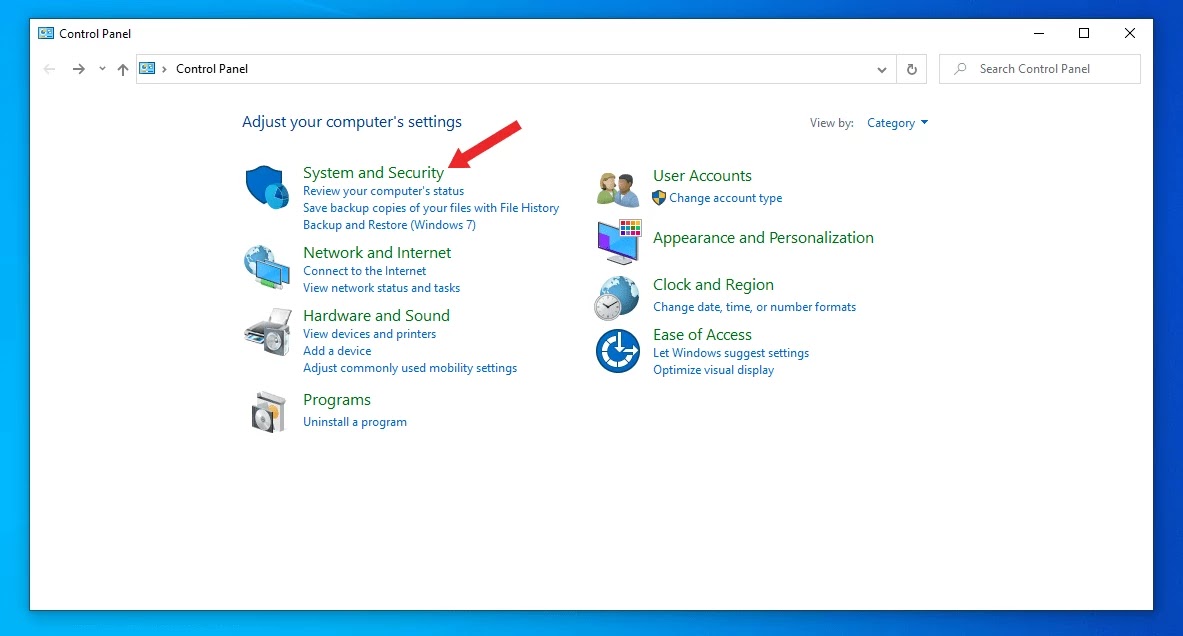
1. Open Control Panel

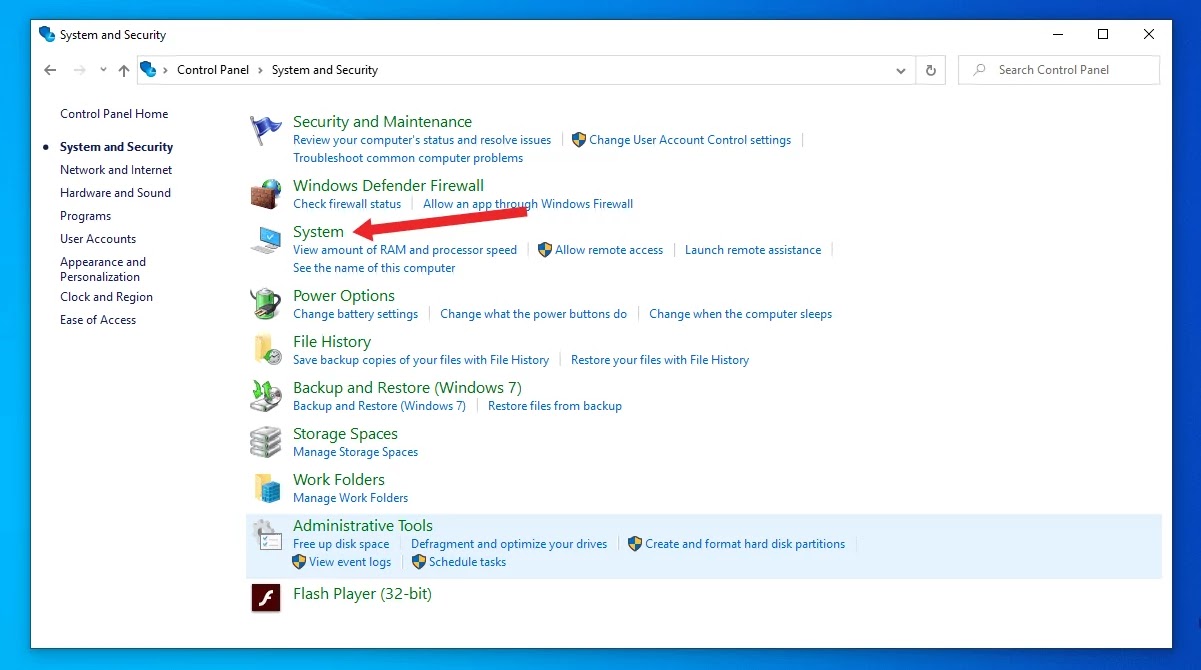
2. Open System and Security
Chack Processor in PC

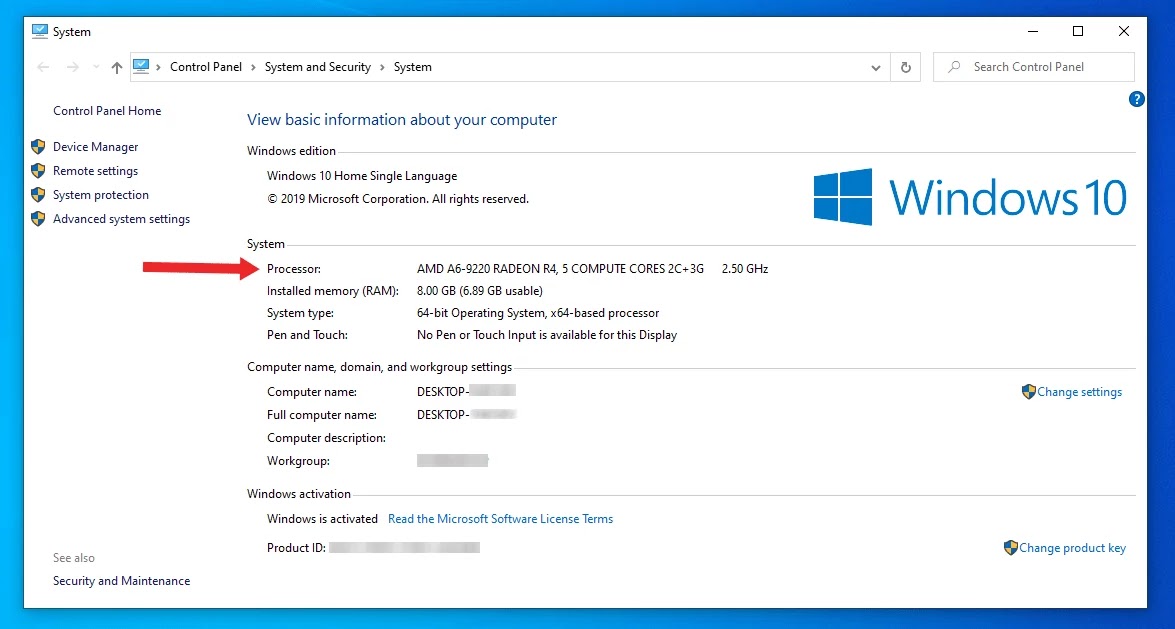
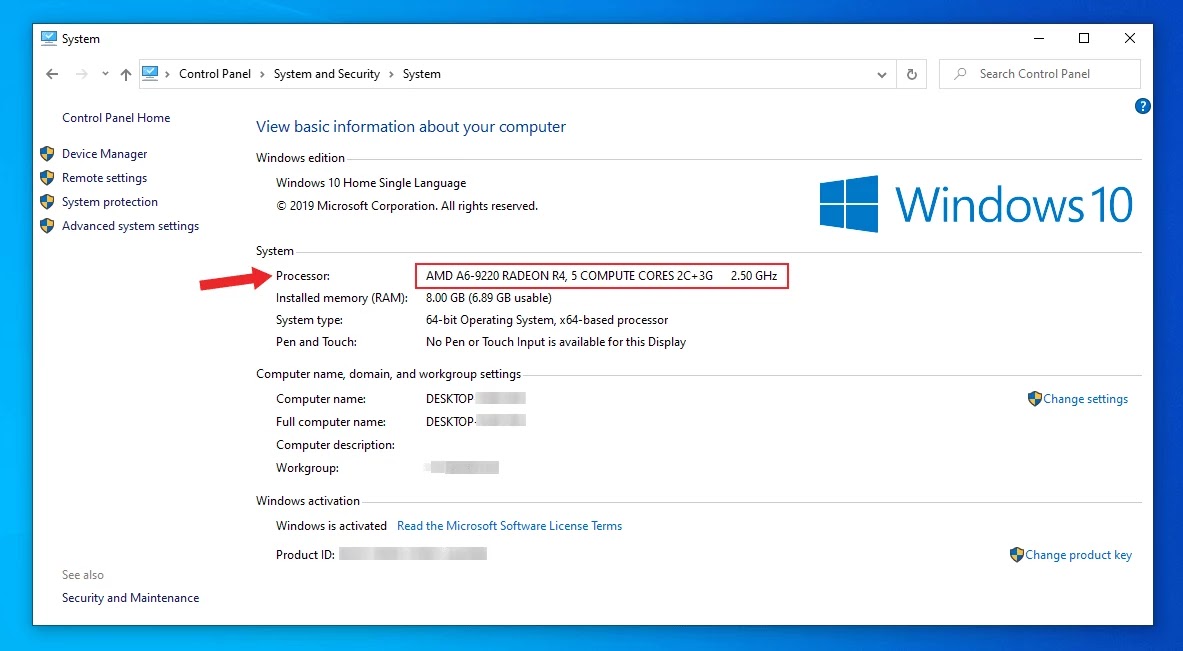
3. Open System
Check Processor in PC

4. Check Processor in PC
Check Processor in PC


Also, Read more
How to Create Bootable USB using Power iso
What is Bootable USB And How to Create
How To Make A Windows 10 Bootable USB (2020)
How to Format a Flash Drive on Windows 10
How to Make Bootable USB With Power ISO 2020
What is Bootable Pendrive
How to Create Bootable Pendrive for Kali Linux (2020)

How to Create Bootable USB using Power iso

How to Create Bootable USB using Power ISO


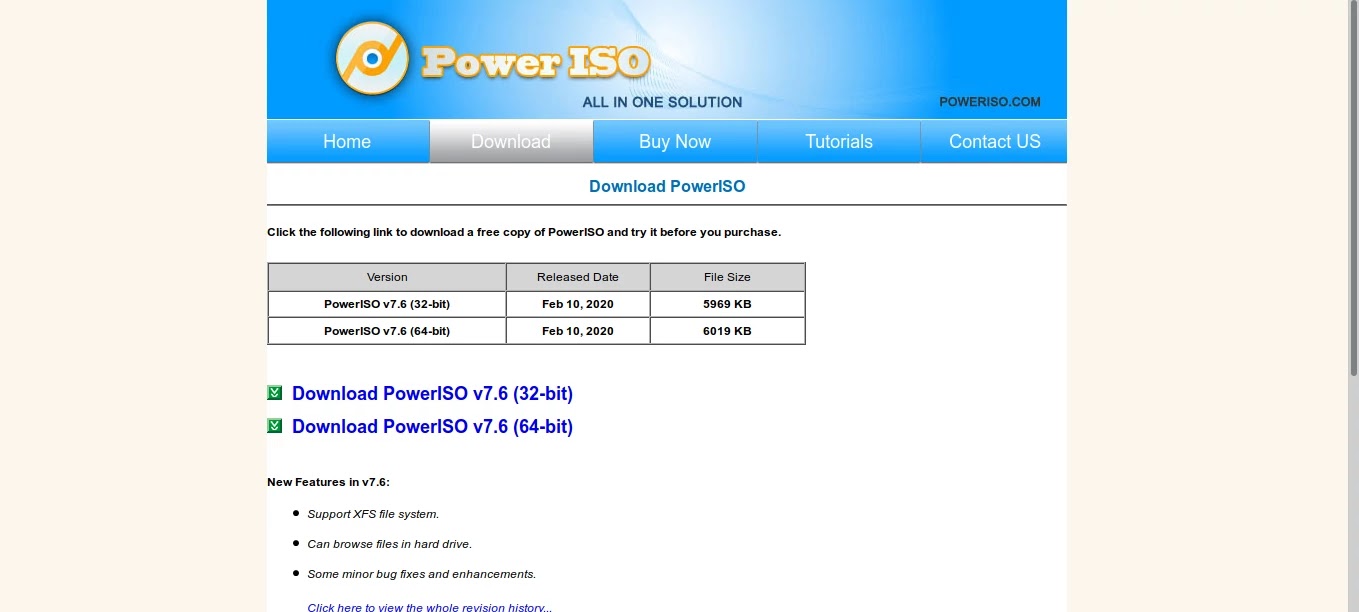
1. Download Power ISO

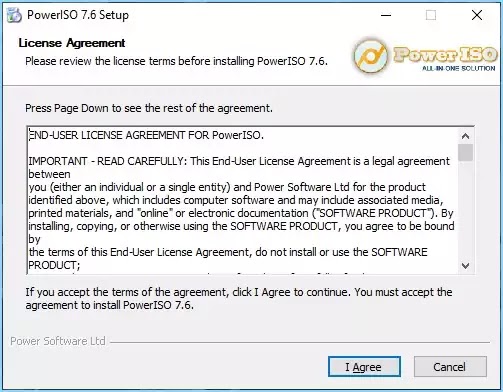
2. Open Power ISO Download file for  installation

3. Click on Next

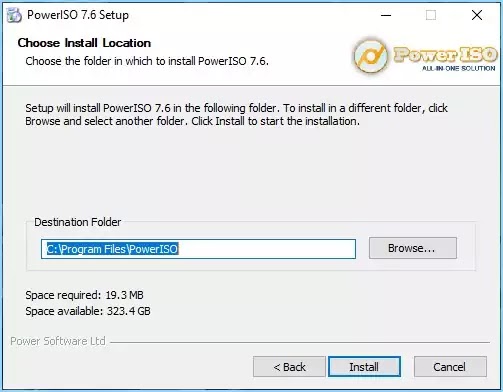
4. Select Location for install files and click on next

5. Wait some time for the complete process

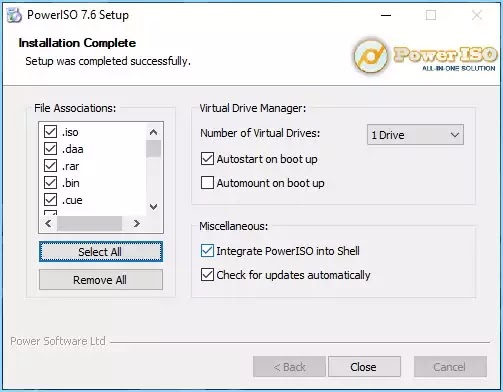
7.  Select all File Associations and close it

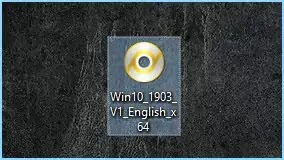
8. Open Power ISO by Shortcut icon on Desktop

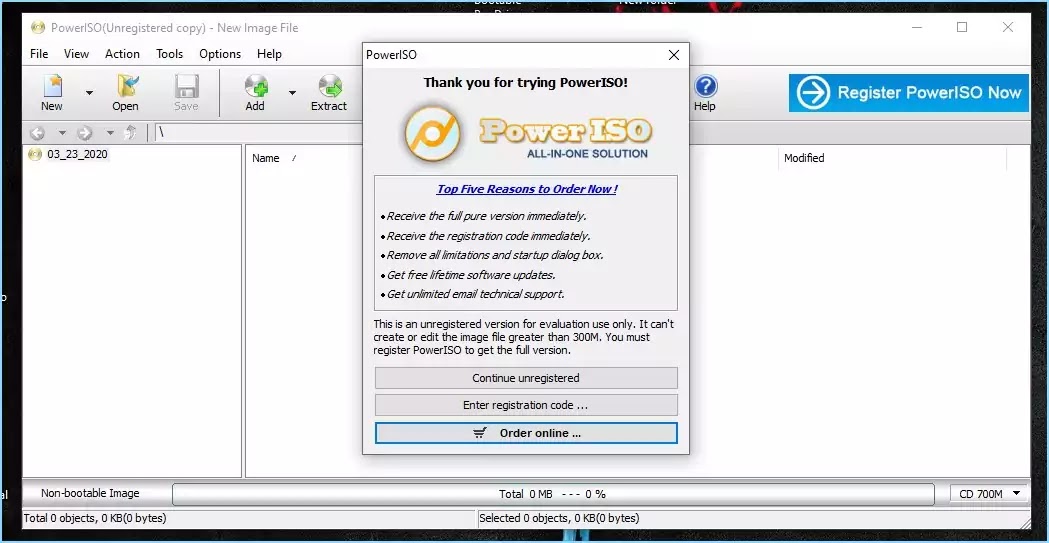
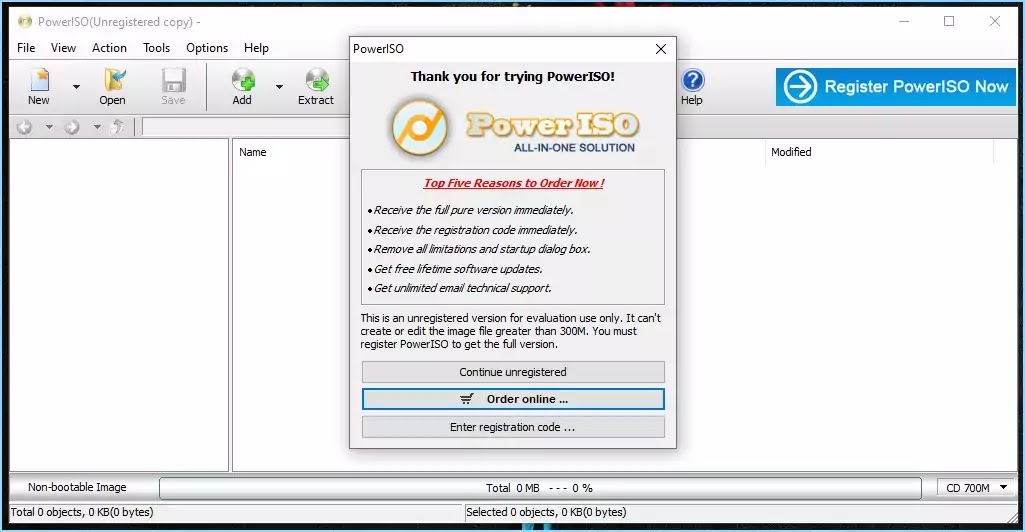
9.  Wait 5 Second and click on Continue unregistered
Wait 5 Second and click on Continue unregistered

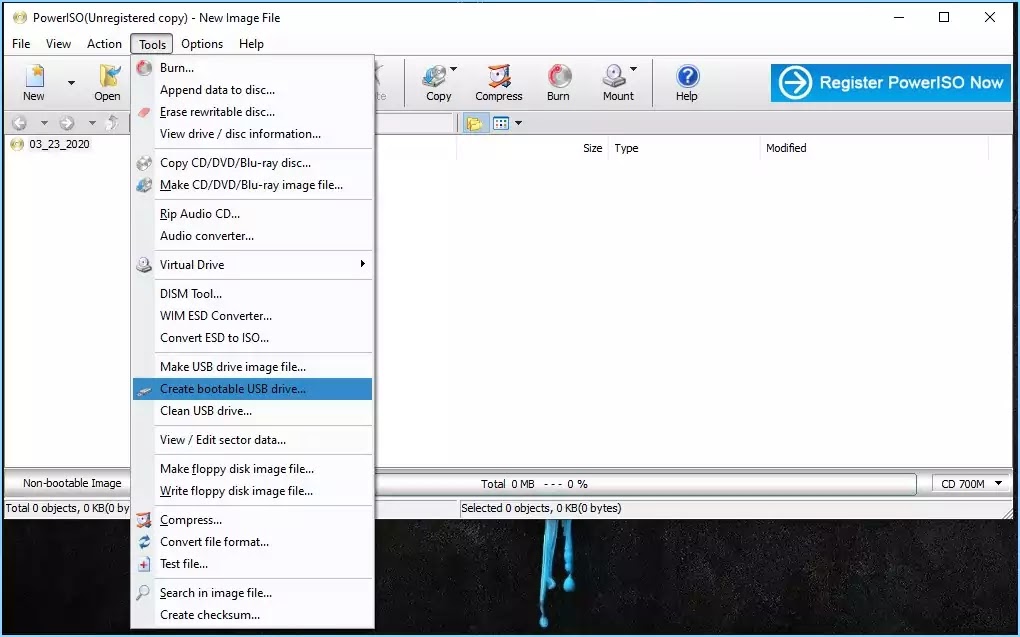
10.  Open Create bootable USB drive

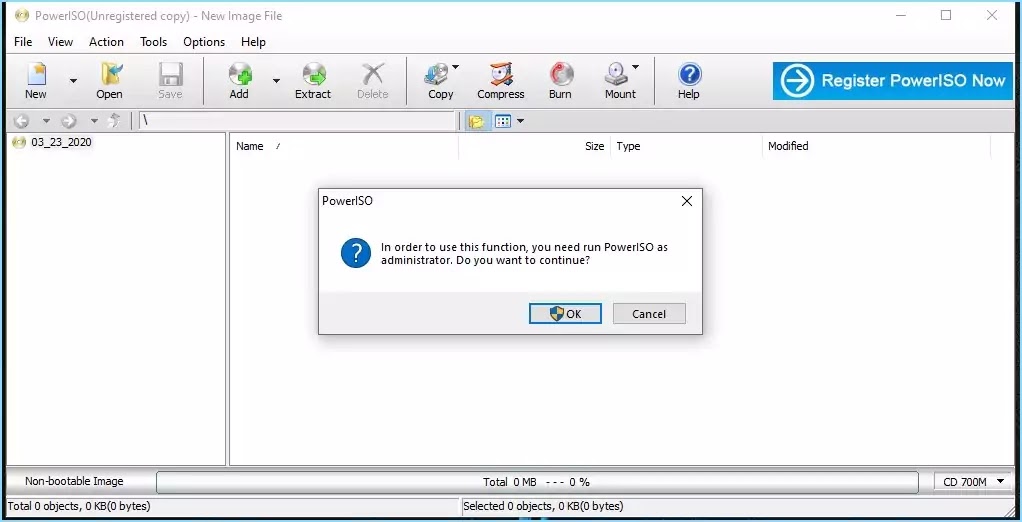
11.  Click on Ok (Reopening it automatically )
Click on Ok (Reopening it automatically )

12. Click on Continue unregistered
Click on Continue unregistered


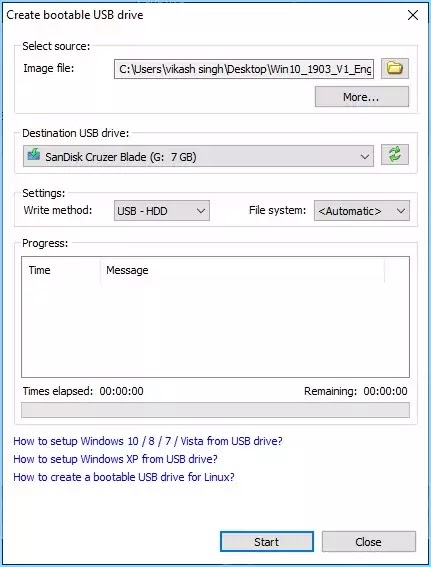
13.Create a bootable USB drive

  • Browse Operating System ISO Image
  • Select USB (minimum 8 GB)
  • Click on Start


14. Click on Ok
click on ok for Create a bootable USB drive

15.  The Process starts but it takes the same time the Rufus is the best way to create bootable USB for any Operating System

Also, Read more
How to Create Bootable USB using Power iso
What is Bootable USB And How to Create
How To Make A Windows 10 Bootable USB (2020)
How to Format a Flash Drive on Windows 10
How to Make Bootable USB With Power ISO 2020
What is Bootable Pendrive
How to Create Bootable Pendrive for Kali Linux (2020)

How to uninstall Software in Windows 10

How to uninstall a Software in Windows 10


Many time we need to uninstall Program like Software, Games and more. So how to Uninstall Sofware from our windows 10. This method work in all windows Just like windows 10/8.1/7.

So How to uninstall software in Windows 10 simply we are uninstall any software from Contral panel of windows. Control Panel  is a software it's control full computer just like we change Date, Time, Password, Username, and more
How to uninstall Software in Windows 10

So Simply Follow this steps for uninstall software in Windows 10

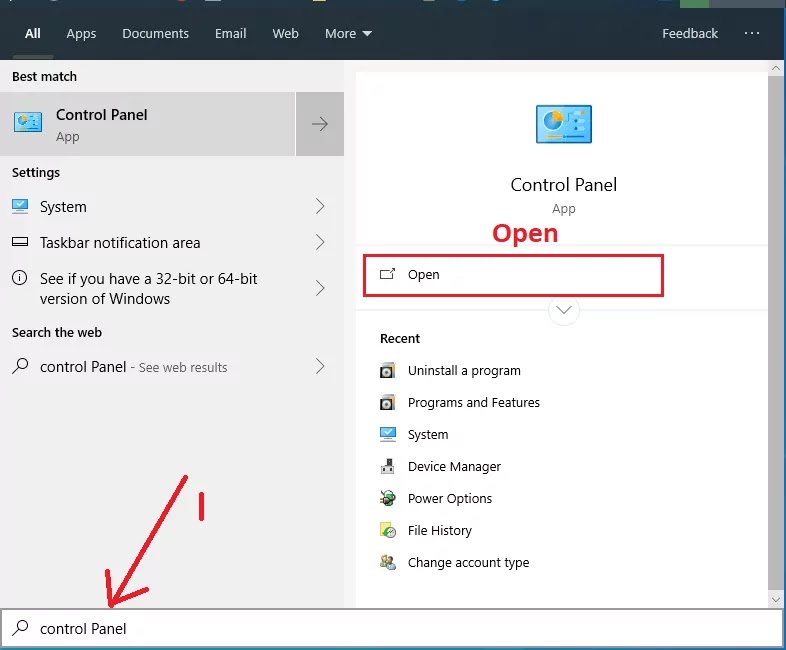
1.Search Control Panel and open
How to uninstall Software in Windows 10

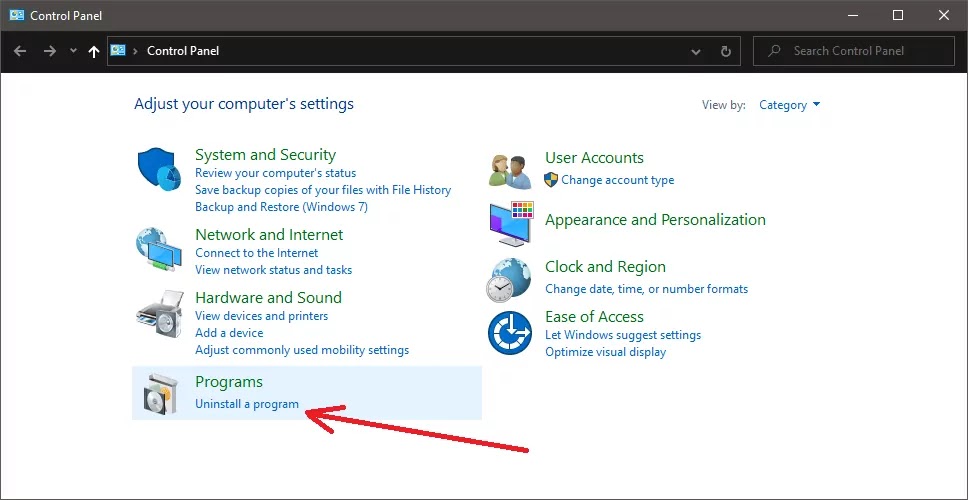
2. Select Uninstall a Program
How to uninstall Software in Windows 10

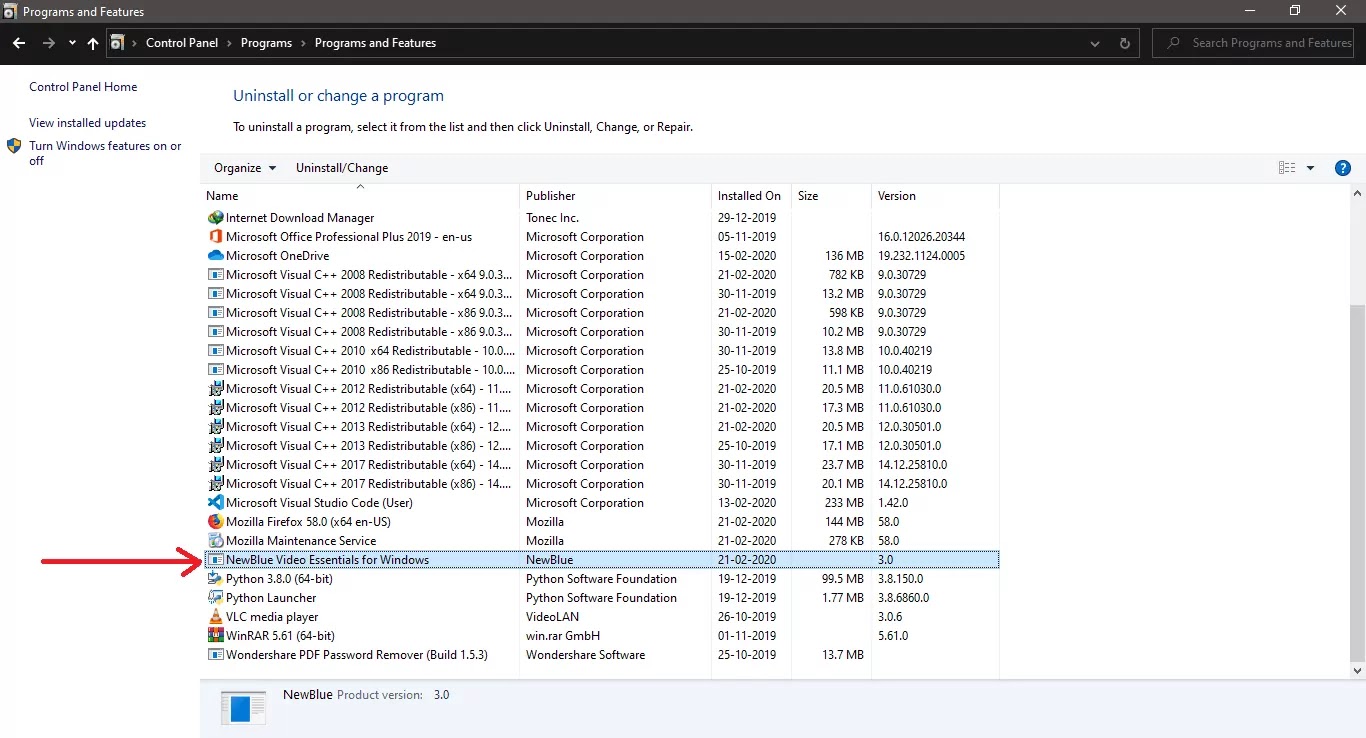
3. Dual Click on Software for uninstall
Dual Click on software for uninstall

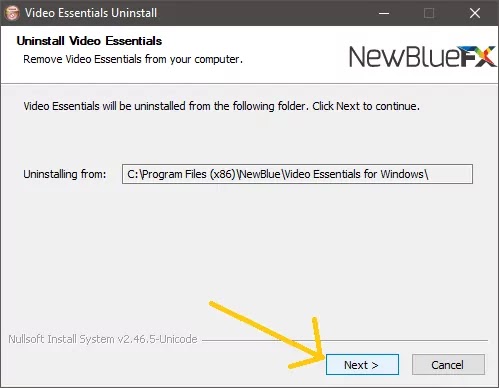
4. Uninstall Software by click next next
Click on bext and next for uninstall Software in Windows 10